


This recipe post for the oh so gorgeous Cherry Apple Galette is going to be very simple. Have a look at the process shots, get your ingredients ready and bake away! It’s so good!
It’s simple, fun to make, and it’s a beautiful dessert to enjoy with your loved ones! Try to eat a slice while it’s still warm!
If you do make this rustic pie, take a picture and share it on Instagram so we can see it! Tag it @freshisreal_ #freshisreal

Steps to Make the Galette
To begin, you will need to get your crust ingredients ready. Having ice cold water on hand will come in handy. To do so, you can add a few ice cubes to a cup of water and set it aside until you are ready to use it.
Having cold butter (vegan or regular) is also important to make a good crust for this Cherry Apple Galette recipe.
Read the recipe instructions, at the bottom of the post, for all the process steps.

Preparing the Filling
The galette filling is easy to make. I used frozen cherries and fresh apples although I’m pretty sure you could use other fruits for this recipe.
A little maple syrup and some vanilla extract or pure vanilla bean powder also adds flavour to the pie filling mixture. If you don’t have any it will be fine. Adding a squeeze of fresh lemon juice is also an option.
To help thicken the mixture I included gluten-free minute tapioca because I had some. If you don’t have any simply adding a little tapioca flour will help to do the trick. You don’t need a lot, just a little.

Rolling Out the Dough
Once you’re ready to roll out the cold refrigerated dough, get some parchment paper ready as it will be helpful for the next few steps.
You’ll notice that in the pictures, I cut out the top sheet to an approximate 13-inch circle. That’s because, you’ll be keeping that sheet to bake the crust. It will end up under the galette.

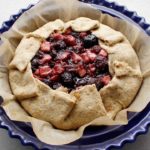
Preparing the Galette
Once you have your dough ready, and the filling has cooled off a bit, you will proceed to combine both and fold over the edges of the crust.
Read the instructions in the recipe post and have a look at the pictures below to help you with these steps.


Fresh is Real’s Amazon Storefront
Visit my Amazon Storefront to search for and buy baking and kitchen staples! Take Me Shopping!
Optional Step
Before you bake your galette, you can sprinkle some coarse sugar like turbinado sugar, organic cane sugar or even maple syrup powdered sugar if you have some.
Adding the coarse sugar helps to decorate the pie and adds a little extra sweetness but it’s not necessary.
You could also drizzle maple syrup on your slice when serving it if you tend to like sweeter desserts.

Previously on FiR
The bagel recipe! Have you seen yet? I am so proud of all the bakers that have taken the time to boil and bake the beautiful bagels!
Here’s the bagel recipe in case you have more time to bake these days!

Questions Before You Start?
The best way to ask your recipe questions is in the comments of this post (scroll to the bottom) or the Facebook group.
The group is a great place to ask allergen-friendly baking questions, get tips, inspiration and share recipes! Join our amazing and friendly Gluten-Free Vegan Baking by Fresh is Real Facebook Group!
Did You Make This Recipe?
Once you try this recipe, remember to take a picture and share it with us on Instagram Tag it @Freshisreal_ #freshisreal
Print
Cherry Apple Galette
- Prep Time: 30 minutes
- Cook Time: 45 minutes
- Total Time: 1 hour 15 minutes
- Yield: 6 1x
- Category: Desserts
- Method: Stovetop, Oven-Baked
- Cuisine: Gluten-Free, Vegan, Plant-Based, Allergen-Friendly
- Diet: Gluten Free
Description
Do you have frozen or fresh fruits and would love to use them up in a simple but impressive dessert? This 10-ingredient gluten-free, vegan Cherry Apple Galette is gorgeous, rustic and naturally sweetened. If you don’t have cherries or apples, I’m sure other fruits would work too!
Ingredients
Crust
- 1/2 cup GF buckwheat flour (fine and light in colour)
- 1 cup GF oat flour (I milled quick oats)
- 1/2 cup tapioca flour
- 1/2 cup cold butter (vegan or regular), cubbed
- 1/2 teaspoon sea salt
- 1 tablespoon coconut palm sugar
- 5 tablespoons water, ice cold
Cherry Apple Filling
- 2 generous cups frozen cherries
- 3 apples, peeled/diced
- 1/3 cup maple syrup
- 1 teaspoon vanilla extract (or 1/4 teaspoon pure vanilla bean powder)
- 2–3 tablespoons GF minute tapioca or 1.5 tablespoons tapioca flour
- Turbinado sugar or organic cane sugar (optional)
Instructions
Before you begin, have a look at the process picture in the post, they will help you make this beautiful Cherry Apple Galette!
Step 1
Preheat your oven to 375° F. Get a couple of sheets (approx. 13 x 15-inch) of unbleached parchment paper ready and a pie plate or oven-safe baking dish/sheet. Place a few ice cubes into one cup of water, set aside for the crust.
Step 2
To begin, combine the dry crust ingredients with smaller cut up pieces of cold butter. Use a fork and press down on the butter pieces to mash them into the dry ingredients. You want to transform the ingredients into a crumbly mixture.
Add 3 tablespoons of ice-cold water and continue pressing down and combining the water with the dough. If it’s still dry, go ahead and add 2 more tablespoons of water. You can use your fingers in a pinching motion to make sure the dough is just moist enough to shape it into a ball. Wrap the dough ball and refrigerate it for 20 minutes or until your pie filling mixture is ready.
Step 3
In a medium saucepan on a low to medium heat, combine the galette filling ingredients except for the minute tapioca (or tapioca flour), mix and simmer. After 10 to 15 minutes or once everything is bubbling, stir the filling mixture then add the tapioca. Keep a close eye on your fruits as the filling will start to thicken very fast. Turn the heat off as soon as all the liquid absorbs. Set aside.
Step 4
Use two sheets of unbleached parchment paper to help you roll out your dough. You can cut one to an approx. 13-in circle (see process pictures). Place the refrigerated dough ball in between the sheets of parchment paper, keeping the circular one on top to begin. Roll the dough to a 13 to 14-inch circle or as large as your parchment paper circle. Keep the cut piece of parchment paper on the bottom and transfer the rolled out dough to a pie plate or oven-safe baking sheet. Peel off the top layer of parchment paper. The base paper, the one that you cut, will stay during the baking time.
If using a pie plate, gently push down in the center of the crust to help shape it. Transfer pie filling to the galette center. Fold over about 2 inches of the edge over toward the center of the galette. Sprinkle the center of the pie filling and some of the crust with turbinado sugar. This step is optional.
Bake the galette in your preheated oven, on the center rack, for 45 minutes at 375° F. Remove from the oven, let cool for about 15 minutes before serving. Enjoy a slice while it’s still warm!
Notes
If you follow a strict gluten-free diet, please make sure that all your ingredients are certified GF.