

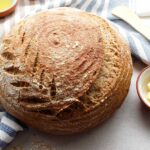
If you’ve recently created a gluten-free sourdough starter, the 7-Inch Sourdough Boule (GF/V) is the perfect bread recipe to try! The ingredients are similar to my other sourdoughs, although this recipe includes the best ratios of GF flours and starches to bake the tastiest round loaf.


After making this recipe at least once per week in the past few months, I had to share it! It’s fantastic fresh (cool it first) and makes the best toast/sandwiches! Don’t worry the perfectly crisp crust will soften as it cools!
Each time I write the instructions for a new gluten-free, plant-based/vegan bread recipe, I strive to make the process as easy as possible. My goal is to have as many people give it a try—even regular wheat-eating peeps!
Be excited as making gluten-free sourdough bread is way less scary than preparing the wheat-based version. The steps are simpler to understand.
As you practice, you’ll gain more experience with how your dough should look and feel. And also, what to try if your mixture is too wet or dry and you need a Plan B. Take notes each time you bake a loaf, be patient and enjoy the process!

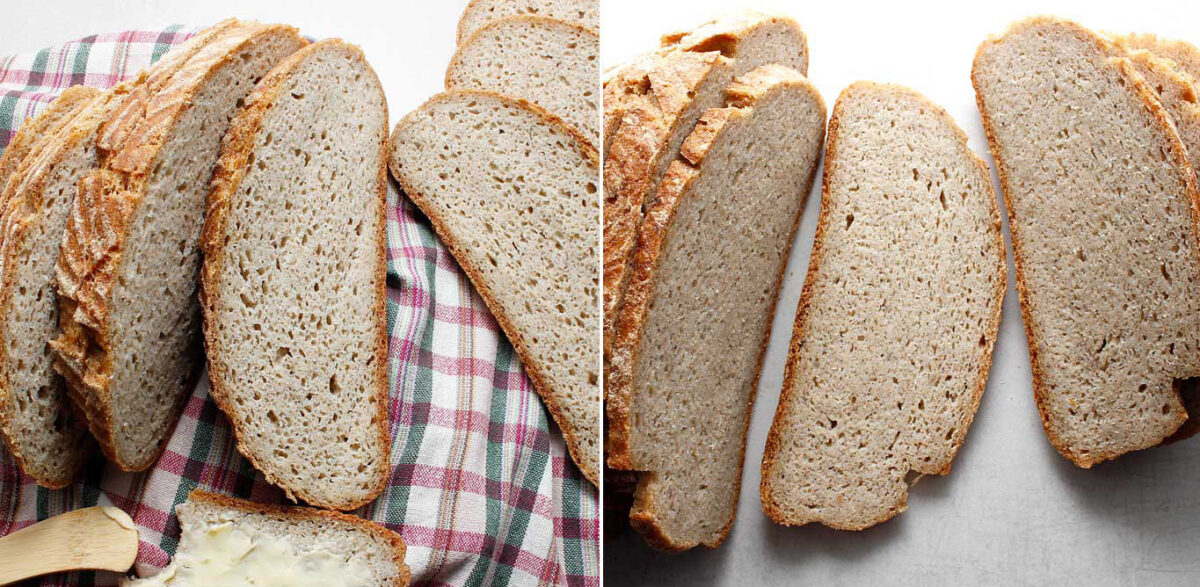
Table of Contents
- Why this 7-Inch Sourdough Boule?
- What is an Active, Fed & Bubbly Starter?
- Gluten-Free Sourdough Starter Recipes
- What To Expect (Baking Schedule Example)
- Ingredients
- Tools
- How to Make this Sourdough
- Tips for a Successful Bake
- Similar Recipes To Try
- Watch YouTube Recipe Video Tutorial
- How to Bake the Dough in a Bread Pan

Why This 7-Inch Sourdough Boule?
Home bakers often want an airier and soft gluten-free crumb. Many also prefer to reduce the overall starch in a bread recipe. I’ve created both types of sourdough bread recipes on this blog.
The combination of ingredients in this specific sourdough recipe has just the perfect ratio of gluten-free flours to starches to soften and lighten the texture—you will love it!
A smaller 7-inch round loaf (boule) is plenty for one to two people for the week!
Sourdough bread is fermented, so it should be easier to digest. It’s filling and will keep a stomach happy and satiated for longer than store-bought white processed bread. Enjoying one or two slices per day is often plenty for most.

What is an Active, Fed & Bubbly Starter?
Active means that the starter has been fed with gluten-free flour and water and had time to transform into wild yeast. A GF sourdough starter will display many happy bubbles throughout when it’s at its peak of activity.
The photo above is a great example of a starter that I would call ready to use in a bread recipe. Using the starter when it’s lively will help to create the best rise at the proofing and baking stage. Note that a gluten-free sourdough starter doesn’t necessarily double in size.
Whether you use brown rice, sorghum or a different GF flour, the look of your starter could vary. If it separates a little, at the top or bottom, that’s ok too! It doesn’t mean it’s bad.
The clearest sign of a starter gone bad is the smell and if you see mold. Otherwise, it’s probably fine and will revive after one or a few feedings.
Gluten-Free Sourdough Starter Recipes
Here are some GF sourdough starter recipes on the blog:
- Easiest GF Sourdough Starter
(Brown Rice Flour, Smaller Portion) - Gluten-Free Sourdough Starter
(Brown Rice Flour) - Sorghum Flour Sourdough Starter
- Grain-Free Sourdough Starter

What To Expect
Baking schedule example for this recipe:
- (Evening Day 1) Remove the starter from the refrigerator and feed it (set aside overnight).
- (Morning Day 2) Feed the starter again and wait until it’s active (2-4 hours).
- (Starter is Ready) Mix your bread ingredients and rise the dough (3-5 hours).
- Bake (1 hour 20 minutes).
- Cool loaf (4-6 hours). Enjoy the bread!
One could also start the process in the morning, but it could mean only baking later in the evening.
If a starter was already out at room temperature, is active and ready to use, go ahead and mix the bread ingredients, rise and bake all in the same day.

Ingredients
Please note that I don’t bake with xanthan gum. I develop all my bread recipes to have as few ingredients as possible, without food additives.
Brown Rice Sourdough Starter – The star ingredient of this recipe! Once you have an established natural wild yeast sourdough starter, make sure to feed it a couple of times before mixing some in a bread recipe.
Psyllium Husk – When not using xanthan gum, adding psyllium husk (whole or powder) to a gluten-free bread recipe is perfect. When combined with water, the nutritious fibre turns into a gel, which helps stick everything together. Psyllium is a binder (glue) for gluten-free bread recipes.
Maple Syrup – A little pure natural sweetness will keep the yeast happy in a bread recipe.
Olive Oil – Adding extra virgin olive oil to a gluten-free bread recipe creates a tender, soft crumb, and it also helps to crisp up the crust.
Water – A clean water source (preferably not tap water) is essential when making good bread. Also, the water temperature helps the yeast activity in the dough. Mixing in room temperature water (70-85°F) works best with sourdough bread recipes.
Potato Starch (not potato flour) – This starch is what truly changes the texture and flavour of a gluten-free bread recipe. You can try other starches, but there’s something special about potato starch. It creates the best mouthfeel in gluten-free bread recipes.
Tapioca Starch – This starchy ingredient is also great to lighten gluten-free bread recipes. As an alternative, arrowroot starch is a good sub. Tapioca starch is sometimes labelled tapioca flour.
Light Buckwheat Flour – Buckwheat is an excellent flour for gluten-free baking. If you don’t have access to lighter-coloured and mild-tasting buckwheat flour, consider grinding/milling buckwheat groats into a fine flour.
GF Oat Flour – Gluten-free certified oat flour is a beautiful flour to combine with other baking ingredients. It, too, will transform the bread recipe and give it an incredible flavour. If you can’t find GF oat flour, you can mill GF oats into fresh flour!
Brown Rice Flour – A good source of fine brown rice flour is ideal for GF bread baking. If you have access to organic brown rice flour, give it a try! It’s even better!
Sea Salt – I often have grey sea salt on hand. Before adding sea salt to a recipe, taste yours. Some brands are way saltier than others. For that reason, you might need to adjust the overall amount of salt you add to the dough mixture. Adding salt to your dough is almost necessary. Your bread will taste bland if you don’t.

Recipe Tools
- Large Mixing Bowl (or Stand Mixer bowl)
- Large Bowl
- Sifter/Sieve/Strainer
- Kitchen Scale
- Silicone Spatula
- Banneton Basket/Soup Bowl
- Dutch Oven (5qt or Larger)
- Unbleached Parchment Paper
- Lame or Sharp Blade
- Wire Rack

Use a stand mixer as an alternative to mixing the dough by hand or with a spoon.
The best experiment is to try both mixing methods to compare your results.
How to Make Gluten-Free Sourdough
Before starting, watch the 7-Inch Sourdough Boule (GF/V) recipe video.
Step 1
The evening before baking, refresh (feed) your GF sourdough starter.
Schedule Example: Remove the starter jar from the fridge around dinnertime and wait a few hours. I keep about 1 cup of starter in the jar when I refrigerate it between bakes. Feed the starter before bedtime. It doesn’t have to be precise. Add a few heaping spoonfuls of brown rice flour with enough water to stir.
First thing in the morning, take a portion of the starter and feed it again to get it even livelier. Do so by combining approximately 1/2 cup active starter 133g with 70g brown rice flour and 62g water (mix & cover) and wait until it gets bubbly/active again—usually a few hours. Or feed the starter a second time, right in the same jar, using the previous measurements as a guide. The goal is to create enough bubbly sourdough starter for the recipe (265g/1 cup). TIP: Feeding the starter more, right in the same jar is often faster.
Step 2
Combine the room temperature water (about 70-85°F), whole psyllium husk, maple syrup, and olive oil in a large mixing bowl (or stand mixer bowl) and whisk well. Set aside for 5 to 10 minutes.
Step 3
To a separate bowl, combine, sift and mix all the remaining dry ingredients including the sea salt.
Step 4
Add the dry ingredients from Step 3 and the GF sourdough starter to the large mixing bowl with the psyllium gel. Mix with a spoon, hand(s), or stand mixer until the dough is well combined. If it’s too dry, add one or two additional tablespoons of water if necessary. The final dough texture should feel smooth, not dry and might be sticky. If the dough sticks to your fingers (if mixing by hand), that’s ok! Scrape them down and wash them once finished.
Step 5
Dust a 7-inch banneton basket with a bit of brown rice flour to prevent sticking. Alternatively, place a clean tea towel into a soup bowl and dust the towel with flour. Gather the dough in your hands and smooth it out by patting it to fix any imperfections. Place the smoothest side down into the basket (it will become the top once flipped over to bake). Insert the dough basket in a large plastic bag or cover with a clean tea towel.
Find a cozy spot in the kitchen and let it rise for 3 to 5 hours. The dough is ready to bake once it shows some growth (usually half to 1-inch in height). See #4 in picture below. The dough will not double in size but should spring back if gently pressed down with a finger.


Step 6
One hour (min. 30 minutes) before baking the sourdough, preheat the oven and Dutch oven to 425°F. Position the oven rack on the lower half so the Dutch oven will be centered when baking. If you have a baking stone/steel, you can leave it in the oven as well.
Step 7
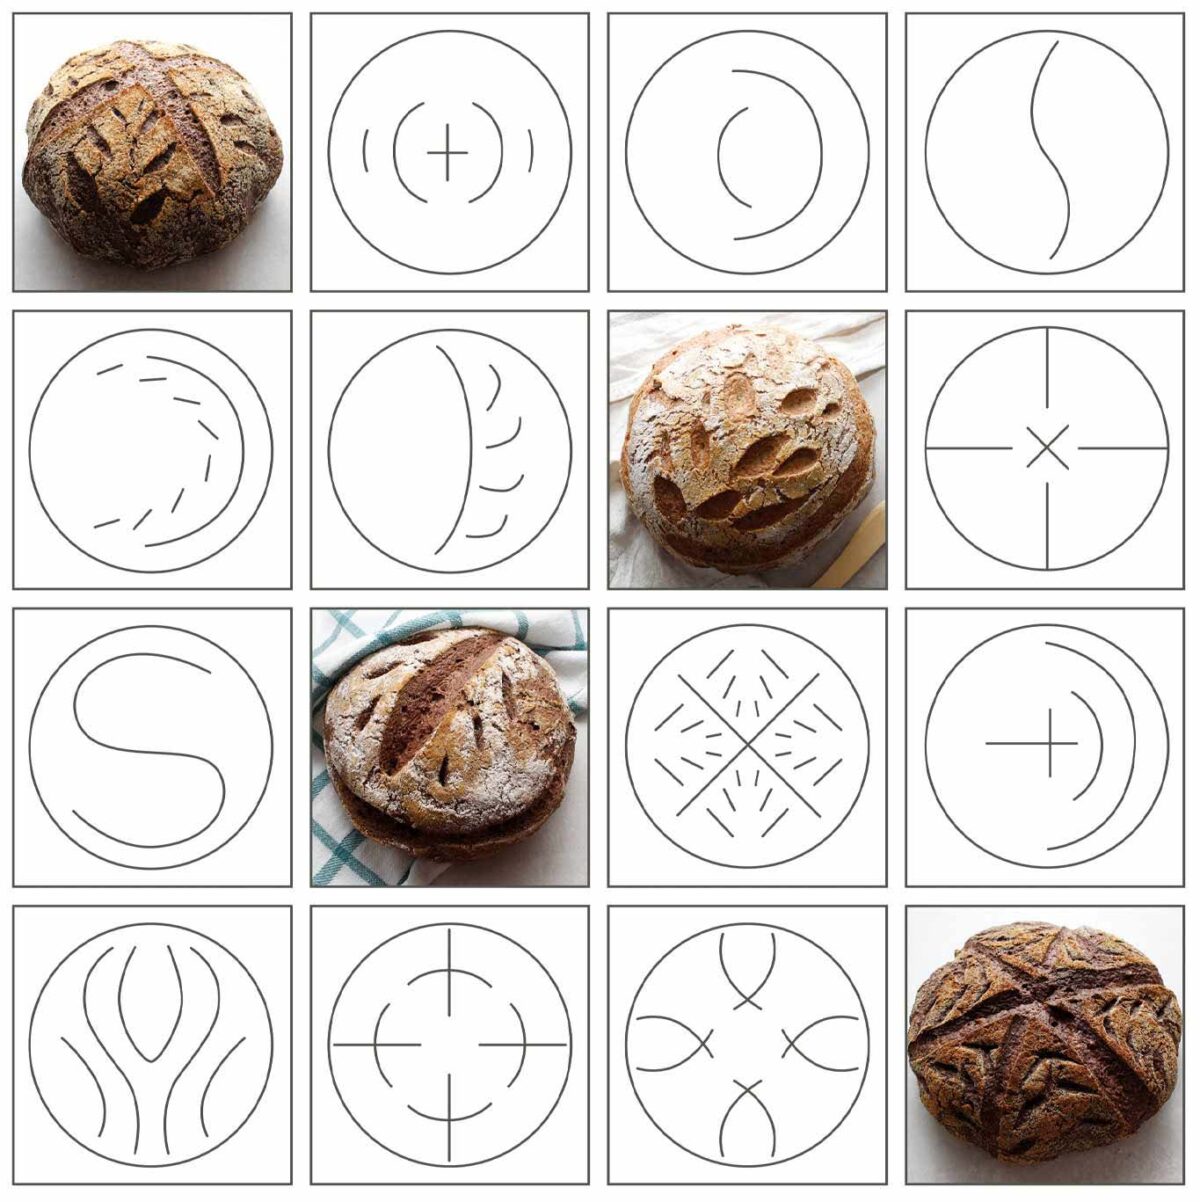
Once the dough looks ready (#4 in the picture above is perfect) and the oven is hot, remove the Dutch oven from oven. Be careful—it will be hot! Gently flip the dough boule onto a piece of parchment paper. Brush off excess flour. Score the dough with one line across holding the blade on a slight angle, about 1/4-in deep. Or try one of the design examples below.

Transfer the dough with the parchment paper to the Dutch oven, add a couple of ice cubes on the side of the parchment paper and close the lid. Bake for 40 minutes covered and approximately 40 minutes uncovered. The bread is ready when it’s darker in colour; the crust is hard and sounds hollow all around when tapped. The internal temperature should be about 210°F, although I haven’t checked a loaf this way yet.
Step 8
Remove the boule from the Dutch oven and cool on a rack for at least 4 to 6 hours before slicing. Don’t worry the crust will soften as it cools! Enjoy fresh!


Tips For a Successful Bake
Fresh Ingredients – Combining the freshest flours and starches will help create the best flavour and rise in a gluten-free sourdough bread recipe. If you have access to organic ingredients, try it out to compare the difference!
Water – As mentioned earlier, adding the best source of water in a bread recipe is key. Try not to use chlorinated tap water. Filtered or spring water is great. Room temperature to slightly warm water is ideal.
Sea Salt – Don’t forget the salt! It’s not an ingredient you want to skip. It does help with the flavour and texture of the crumb.
GF Sourdough Starter Aroma – If you don’t like how your starter smells you won’t necessarily like the bread you make with it! My favourite gluten-free sourdough starter smell a little yeasty, sweet, and shouldn’t be too sour (unless that’s what you like).
Be Patient – Don’t rush the process! Baking sourdough is not a fast project but a rewarding one. Forgetting about your starter and rising dough can sometimes work to your advantage. Have fun and with practice you will figure out which tricks work well in your baking environment.
Room Temperature – If your kitchen is freezing cold in the winter months, the process might feel slower than on a hot summer day. Let your environment lead you, again don’t rush the process.
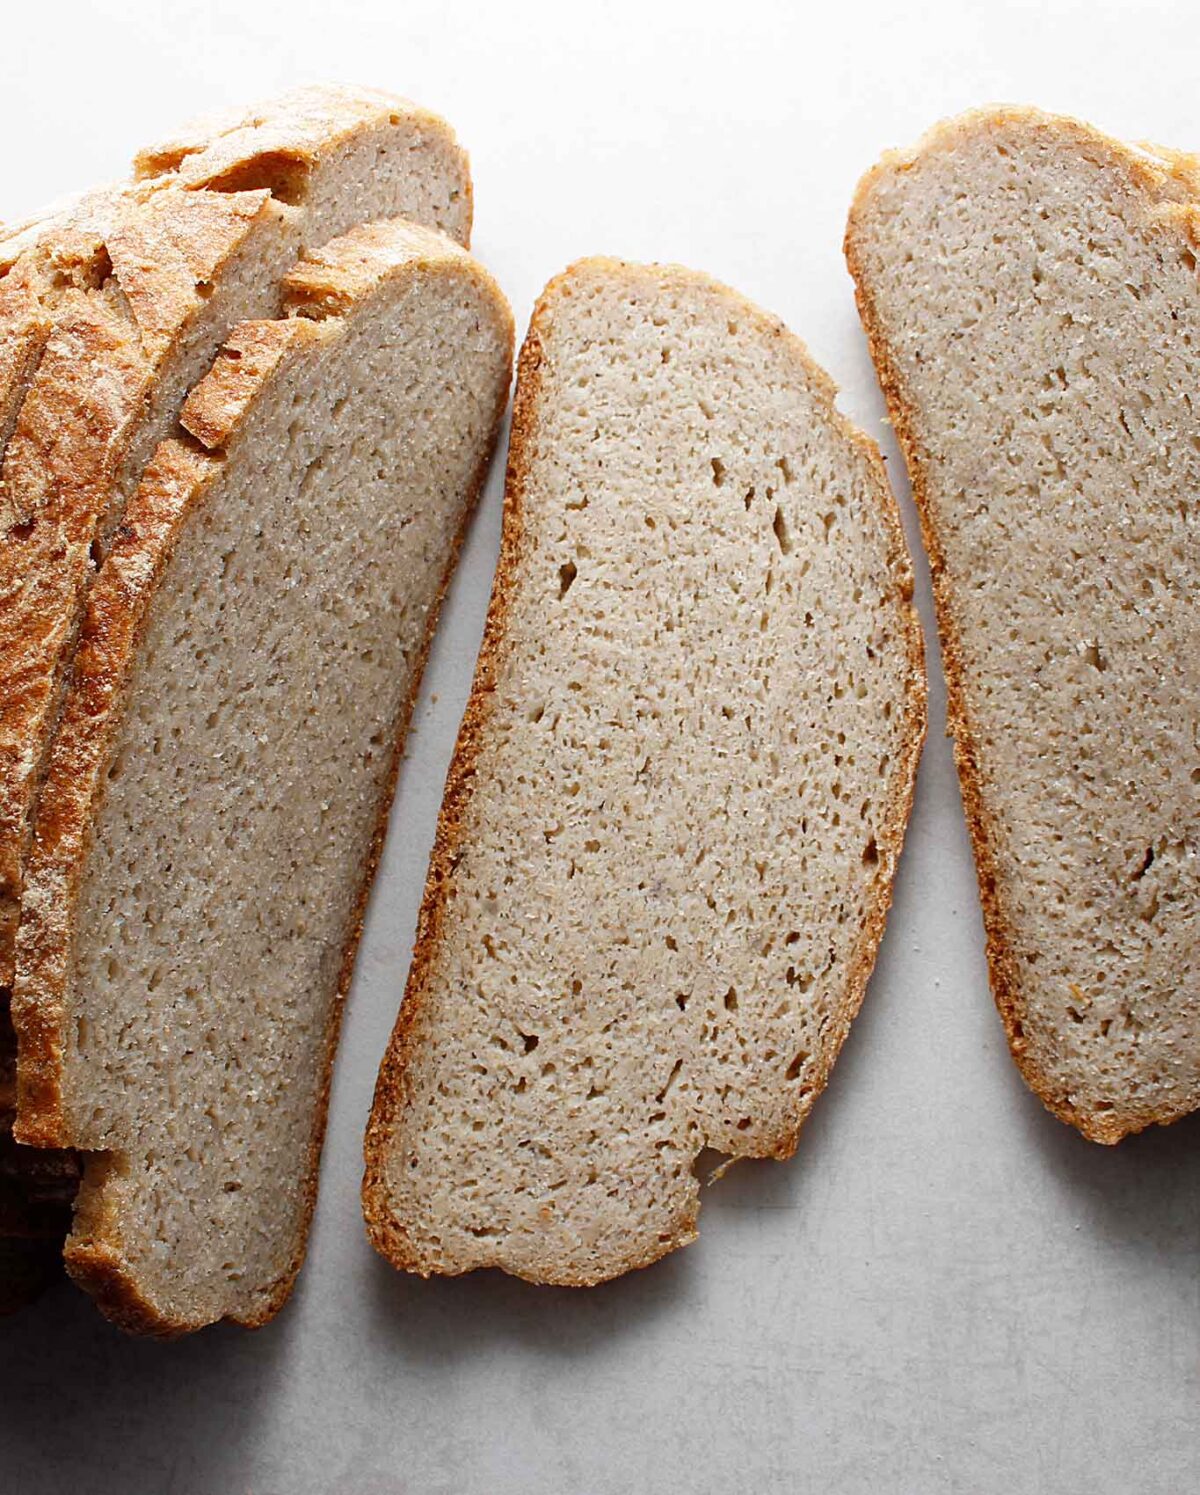
Open Crumb – Many bakers work hard to perfect what they think is the best open and airy crumb. If you’ve achieved a texture and flavour you enjoy, be proud! That’s what matters. Don’t get me wrong, it sure looks pretty to create those large bubbles, but smaller holes will hold your toppings together better.
Baking Temperatures – Double check your oven temperature if your loaves are not baking properly. Just recently I noticed that my oven door wasn’t fully closing. All the heat was escaping which means my oven might not have been baking at the temperature I thought it was. This recipe bakes at 425°F.
Similar Recipes to Try
- Wild Yeast Bread (GF/V)
Makes a larger oat-free loaf. Use your stand mixer for this one. - Original Buckwheat Sourdough
Includes seed/nut flour (protein-rich) and has less starch. - Simple Sorghum Sourdough
Rice-free, proofed overnight in the fridge, easier to digest. - Gluten-Free Sourdough Rolls
Soft oat-free rolls with nutritious ingredients and hemp milk.
Recipe How-To Video (Step-by-Step Tutorial)
How to Bake the Dough in a Bread Pan

Need a Plan B to bake your gluten-free sourdough?
This method will work well if you feel that your dough might be too wet to hold up as a free-form loaf. Or maybe it’s because you like a different shape for your bread slices.
I recommend baking your gluten-free sourdough in an 8.2 x 4.7-inch bread pan. It’s smaller than an average bread pan. You could use a 9 x 5-inch pan, but your loaf won’t bake as high.
Once your dough is mixed, transfer it to your parchment-lined bread pan and cover it. Let it rise for 3 to 5 hours, then follow the baking instructions: 40 mins covered, 40 mins uncovered. Same as the free-from version. Also, keep the 425° F oven temperature.
If you have a baking stone, you can preheat it and place it under the bread pan when baking.


Fresh is Real’s Amazon Storefront
Visit my Amazon Storefront to search for and buy baking and kitchen staples! Take Me Shopping!
Print
7-Inch Sourdough Boule (GF/V)
- Prep Time: 30 minutes
- Cook Time: 1 hour 20 minutes
- Total Time: 1hr 50mins (+3-5hrs rising time, +/-12hrs overall)
- Yield: 1 loaf 1x
- Category: Bread, Sourdough
- Method: Fermentation, Oven-Baked
- Cuisine: Gluten-Free, Vegan, Plant-Based, Allergen-Friendly
- Diet: Gluten Free
Description
The 7-Inch Sourdough Boule is a perfect first bread recipe to make if you’ve recently started or have a gluten-free brown rice sourdough starter. I’ve simplified the steps to make it easier for anyone to try! The ingredients create a perfectly soft crumb and crispy crust that softens once it cools. This sourdough bread is delicious when enjoyed fresh and always amazingly tasty when toasted.
Baking Schedule Example: If you start the process the night before you want to bake, you could enjoy fresh sourdough by the next evening!
- (Evening Day 1) Remove the starter from the refrigerator and feed it (set aside overnight).
- (Morning Day 2) Feed the starter again and wait until it’s active (2-4 hours).
- (Starter is Ready) Mix your bread ingredients and rise the dough (3-5 hours).
- Preheat oven (and Dutch oven) 30-60 minutes before you bake.
- Bake (1 hour 20 minutes).
- Cool (4-6 hours). Enjoy bread!
Tools: Large Mixing Bowl (or Stand Mixer bowl), Large Bowl, Sifter/Sieve/Strainer, Kitchen Scale, Silicone Spatula, Banneton Basket/Soup Bowl, Dutch oven (5qt or Larger), Unbleached Parchment Paper, Lame or Sharp Blade, Wire Rack
Ingredients
- 265g active brown rice sourdough starter (1 cup); see instructions
- 330g/ml room temp water (70-85°F) (plus 1–2 extra tbsps if necessary)
- 20g whole psyllium husk (4 tbsps)
- 20g pure maple syrup (1.5 tbsps)
- 20g olive oil (1.5 tbsps)
- 80g light buckwheat flour (1/2 cup)
- 80g GF oat flour (scant 1 cup)
- 80g potato starch (1/2 cup)
- 60g tapioca starch (1/2 cup)
- 40g brown rice flour (1/4 cup)
- 8–10g sea salt (1/2 tbsp)
Instructions
Before starting, watch the 7-Inch Sourdough Boule (GF/V) recipe video.
Step 1
The evening before baking, refresh (feed) your GF sourdough starter.
- Schedule Example: Remove the starter jar from the fridge around dinnertime and wait a few hours. I keep about 1 cup of starter in the jar when I refrigerate it between bakes. Feed the starter before bedtime. It doesn’t have to be precise. Add a few heaping spoonfuls of brown rice flour with enough water to stir.
- First thing in the morning, take a portion of the starter and feed it again to get it even livelier. Do so by combining approximately 1/2 cup active starter 133g with 70g brown rice flour and 62g water (mix & cover) and wait until it gets bubbly/active again—usually a few hours. Or feed the starter a second time, right in the same jar, using the previous measurements as a guide. The goal is to create enough bubbly sourdough starter for the recipe (265g/1 cup). TIP: Feeding the starter more, right in the same jar is often faster.
Step 2
Combine the room temperature water (about 70-85°F), whole psyllium husk, maple syrup, and olive oil in a large mixing bowl (or stand mixer bowl) and whisk well. Set aside for 5 to 10 minutes. TIP: Touch your water. If it feels too cold, combine boiled and room temperature water to create the desired temperature.
Step 3
In a separate bowl, combine, sift and mix all the remaining dry ingredients including the sea salt.
Step 4
Add the dry ingredients from Step 3 and the GF sourdough starter to the large mixing bowl with the psyllium gel. Mix with a spoon, hand(s), or stand mixer until the dough is well combined. If it’s too dry, add one or two additional tablespoons of water if necessary. The final dough texture should feel smooth, not dry and might be sticky. If the dough sticks to your fingers (if mixing by hand), that’s ok! Scrape them down and wash them once finished.
Step 5
Dust a 7-inch banneton basket with a bit of brown rice flour to prevent sticking. Alternatively, place a clean tea towel into a soup bowl and dust the towel with flour. Gather the dough in your hands and smooth it out by patting it to fix any imperfections. Place the smoothest side down into the basket (it will become the top once flipped over to bake). Insert the dough basket in a large plastic bag or cover with a clean tea towel.
Find a cozy spot in the kitchen and let it rise for 3 to 5 hours. The dough is ready to bake once it shows some growth (usually half to 1-inch in height). See picture in post if unsure. The dough will not double in size but should spring back if gently pressed down with a finger.
Step 6
One hour (min. 30 minutes) before baking the sourdough, preheat the oven and Dutch oven to 425°F. Position the oven rack on the lower half so the Dutch oven will be centered when baking. If you have a baking stone/steel, you can leave it in the oven as well.
Step 7
Once the dough looks ready (see the picture in post) and the oven is hot, remove the Dutch oven from the oven. Be careful—it will be hot! Gently flip the dough boule onto a piece of parchment paper. Brush off excess flour. Score the dough with one line across holding the blade on a slight angle, about 1/4-in deep. Or try one of the designs in the post.
Transfer the dough with the parchment paper to the Dutch oven, add a couple of ice cubes on the side of the parchment paper and close the lid. Bake for 40 minutes covered and approximately 40 minutes uncovered. The bread is ready when it’s darker in colour; the crust is hard and sounds hollow all around when tapped. The internal temperature should be about 210°F, although I haven’t checked a loaf this way yet.
Step 8
Remove the boule from the Dutch oven and cool on a rack for at least 4 to 6 hours before slicing. Don’t worry the crust will soften as it cools! Enjoy fresh!
Notes
Storing Tips: Slice (once completely cooled) the GF sourdough boule and keep it on the counter in a sealed bag or container for a couple of days or in the fridge for 5 to 7 days. Or freeze slices for 1 to 2 months.
Prefer to Measure? You can use the measurements included but I suggest weighing the ingredients it’s more precise. A kitchen scale is helpful.
Need a Substitute?
Please note that I haven’t tested all these alternatives. Also, keep in mind that if you make a few substitutions I can’t promise the outcome will be the same as the original recipe.
– Only have a gluten-free sorghum starter? Try it!
– Use 20 grams of psyllium powder in place of 20 grams of whole husk.
– Switch the maple syrup with coconut palm sugar.
– Oil-Free? Try homemade hemp milk or plant-based milk.
– Don’t have light buckwheat flour, use sorghum flour.
– Oat-Free? Swap the oat flour for sorghum flour.
– Don’t have tapioca starch? Use arrowroot starch.
– Rice-Free? Try this Simple Sorghum Sourdough.
GF Oat-Flour: If you want to use oat flour but only have quick or large oats, mill them in a small blender or spice grinder. It creates the freshest flour!
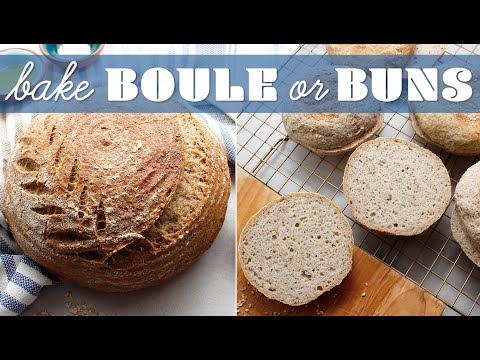
Want to Bake Buns or A Bread Pan Loaf instead of a Free-Form Boule? Watch this video to help you!
Important Toasting Tip: A cast iron pan/griddle makes the best toast! Low temperature, slow toasting (a few minutes each side) will create the ultimate toasted vehicle for the toppings of your choice! Perfect for open-faced sandwiches!
Find it online: https://www.freshisreal.com/7-inch-sourdough-boule-gf-v/