

A less than 10-ingredient dough mix that you can use for pizza crust(s), rolls, or even mini loaves. This basic multi-purpose yeasted bread recipe is gluten-free, vegan, allergen-friendly.


This recipe is my go-to Basic Yeasted Dough (Gluten-Free & Vegan) that I use for various bread creations!
A multi-purpose dough, just like the yeast-free recipe, that is also allergen-friendly. It’s as simple to prepare as the yeast-free bread, although this one includes active dry yeast in the ingredients, and it requires some rising time.
No mixers or special techniques are needed for this recipe. Keep scrolling to see all the process photos to help you make this recipe.
(Originally published February 2018, updated November 2020)

This post may include affiliate links. Read full Privacy Policy.
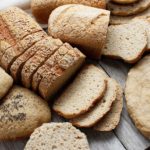
For the post pictures, I baked 3 batches of the basic yeasted dough. It made one regular 7.5-in x 3.5-in loaf, 2 mini loaves 5-in x 2-in, 4 rolls and a smaller pizza crust.
YouTube Video
This video tutorial is from 2+ years ago. Until I film a new one, it will give you a good visual on just how easy the Basic Yeasted Dough (GFV) is to make. I won’t be upset if you mute the audio, it’s bit annoying—I was learning 😉
Keep reading to see the new process pictures. I will include a few new tips to help you bake this wonderful multi-purpose gluten-free vegan dough.

Basic Yeasted Dough
This bread recipe was prepared multiple times over the past few years. Many flour combinations and baking methods were tested to see what would yield the best-tasting loaves/crusts/rolls. I hope you will come to love it as much as my family does.
Making pizza crusts with this dough seems to be everyone’s favourite. The texture is just right. Not gummy or dry but still has a nice chew. Who doesn’t like a good simple pizza crust right?

Food Sensitivities & Allergies
Finding out we can no longer eat gluten, and other common grains or other healthy ingredients is hard! We search high and low for good recipes to replace our favourite meals but it’s not always easy.
The reality is that nothing is the same. We get tempted with gluten-free processed foods, read a lot of labels, and eventually realize that eating too much of those kinds of packaged goods is a mistake. For your health, consume those in moderation or leave them at the store.
The transition can take time, but at some point, we need to take control of our health. We need to start making more nutritious foods at home. Most people can do very well with a mostly plant-based lifestyle. Vegetables and fruits, some grains, seeds, etc. are naturally gluten-free.
Developing bread recipes that are nutrient-dense, gum-free, corn-free, legume-free, and free of all top allergens (egg, soy, dairy, nuts, etc.) are very important to me.

Go-To GFV Bread Recipe
This dough will hopefully become your go-to gluten-free and vegan yeasted bread recipe. Prepare yourself a batch (or two or three) on the weekend and have your bread needs filled for the week.
One dough recipe yields 1 large pizza crust, 2 smaller pizza crusts, or 6 rolls, or 1 average size loaf or 2 mini loaves. You can also make a few smaller pizza crusts with one batch of dough.
For the post pictures, I baked 3 batches of the basic yeasted dough. It made one regular 7.5-in x 3.5-in loaf, 2 mini loaves 5-in x 2-in, 4 rolls and a smaller pizza crust.
The texture of this yeasted dough is surprisingly delicious. The active yeast creates a nice amount of air pockets to lighten the overall density of the bread.

Great Multi-Purpose Dough
This bread makes great sandwiches, toast, rolls and pizza crusts. If you love pizza you’ll appreciate the crispiness of the crust once baked to perfection with your favourite toppings!
I do prefer to warm up this bread on a well-seasoned cast-iron pan. Doing so makes the best toast!
A fresh bun with buttery spread or jam is also really great! Oh, and mashed avocado with a sprinkle of sea salt on a slice of this bread is simple and delicious!

Tools
You don’t need too much to make this dough recipe, but you will need the following:
You’ll need a large bowl (I love using a glass bowl), measuring cups for dry goods and liquids, a kitchen scale if you want to weigh your ingredients, measuring spoons, a mixing spoon, a spatula, a flour sifter, unbleached parchment paper, and baking pans (cookie sheet, loaf pan(s), or other). If you have a baking stone, use it for the pizza or rolls.

The Steps
Depending on if you want to make one large pizza crust or a few smaller ones, two mini loaves, one average size loaf or a few rolls, the process is very similar.
You’ll want to sift your dry ingredients, add the warm water, mix until all the liquid absorbs. You can rise the dough in the mixing bowl or transfer it to a large soup bowl. Let the dough rise for at least 2 hours then transfer the dough to your baking dish(es).
Lately, I prefer flouring my work surface and the dough to then gently shape it before transferring it to my baking pans of choice. You do not need to knead this dough.
If making rolls, in the old video I plop the dough directly onto the baking sheet or in smaller pans, which will work, but if you enjoy handling your dough, go ahead and dust a little flour on your hands or the dough to help you roll them. You can see the rolls in the process photos below.
Bake your crust(s) or loaves according to the times listed in the recipe card below. If baking a pizza, enjoy it once ready and if baking loaves or rolls, cool them first on a wire rack.
The Process Photos


For the post pictures, I baked 3 batches of the basic yeasted dough. It made one regular 7.5-in x 3.5-in loaf, 2 mini loaves 5-in x 2-in, 4 rolls and a smaller pizza crust.

How to Store this Bread
It’s important to mention that if you prefer making more dough and baking more at once, this bread recipe, the pizza crust and even the rolls freeze very well.
I usually freeze any leftovers in plastic bags or glass containers. Slicing the rolls in half and the bread before freezing is recommended. That way it’s super easy to toast.
TIP: if you do bake mini loaves, you can slice the bread horizontally (the wider side) to get larger slices, if that makes sense.
Questions Before You Start?
The best way to ask your recipe questions is in the comments of this post (scroll to the bottom) or the Facebook group.
The group is a great place to ask allergen-friendly baking questions, get tips, inspiration and share recipes! Join our amazing and friendly Gluten-Free Vegan Baking by Fresh is Real Facebook Group!
| 👩🍳 🍞 Good Food Cooking School 🥖🍪 | |
| If you’re interested in learning more about gluten-free baking, check out the Good Food Cooking School courses taught by cookbook author Heather Crosby from YumUniversity. I took the Bread Baking and the Classic Cookies 101 course a while back, and it’s what got me hooked on my baking journey. Take a tour to see if her baking courses are right for you! |


More Fresh is Real Bread Recipes
Yeasted (with active dry yeast):
- Gluten-Free Vegan Bread Machine Loaf
- Easy Gluten-Free Vegan Bagels
- Japanese Milk Bread (GFV)
- No-Fuss Kombucha Buns
- Soft Gluten-Free Dinner Rolls
Yeast-Free (no commercial or wild yeast):
Sourdough (with natural wild GF starter):
- Gluten-Free BBQ Sourdough
- Wild Yeast Bread (GF/V)
- Buckwheat Sourdough Loaf (GF/V)
- Gluten-Free Sourdough Without Psyllium
- Simple Sorghum Sourdough
- Sourdough Starter Banana Bread
- Banana Sourdough Seed Loaf
Contains both active yeast and wild yeast:
Quick Breads (no added yeast):
Did You Make This Recipe?
Once you try this recipe, remember to take a picture and share it with us on Instagram Tag it @Freshisreal_ #freshisreal


Fresh is Real’s Amazon Storefront
Visit my Amazon Storefront to search for and buy baking and kitchen staples! Take Me Shopping!
ALLERGEN NOTICE
Important: Make sure the ingredients you purchase are prepared in a facility free from the top allergens you avoid. Gluten-free products should be certified GF and clearly labelled. Consult your medical professional with your dietary questions.
Print
Basic Yeasted Dough Gluten-Free Vegan
- Prep Time: 20 minutes
- Cook Time: 20-50 minutes
- Total Time: +/- 3 hours (includes rising time)
- Yield: 1 10-in pizza crust, 2 smaller pizza crusts, 2 mini loaves, 1 reg loaf, or 6 rolls 1x
- Category: Bread, Pizza Crust, Rolls
- Method: Oven-Baked
- Cuisine: Plant-Based, Gluten-Free, Vegan, Nut-Free, Allergen-Friendly
- Diet: Gluten Free
Description
A less than 10-ingredient dough mix that you can use for pizza crust(s), rolls, or even mini loaves. This basic multi-purpose yeasted bread recipe is gluten-free, vegan, allergen-friendly.
Recipe and ingredients adapted and inspired by Heather Crosby:
The Gluten-Free Baking Academy
Ingredients
- 1 cup millet flour (115g)
(or combo 1/2 cup millet (55g) + 1/2 cup sorghum (60g) - 3/4 cup brown rice flour (90g)
- 3/4 cup oat flour (60g)
(or combo 1/2 cup oat flour (35g) + 1/4 cup sunflower seed flour (25g)) - 1/2 cup arrowroot starch (60g)
(or combo 1/4 cup arrowroot starch (30g) + 1/4 cup potato starch (30g)) - 2 tablespoons whole psyllium husk (14g)
- 1 tablespoon coconut palm sugar (12g)
- 1–1/2 teaspoons dry active yeast (8g)
- 1 teaspoon sea salt (6g)
- 1–3/4 (414g) to 2 cups (480g) warm water*
Toppings (optional):
Seeds (flax, hemp, sunflower, pumpkin, sesame, poppy), oats, dried herbs
Instructions
Instructions for Pizza Crust For Now
(See Notes if you’re baking the crust for later)
- To a 2-cup measuring cup, add 1 cup of room temperature water with 1 cup of boiled water. Set aside.
- Place sifter on top of your large mixing bowl. Sift and combine all dry ingredients; flours, psyllium husk, coconut palm sugar, yeast, salt. Remove the sifter and mix the dry ingredients.
- Add water, starting with 1 cup, mix until incorporated. Then add 3/4 cup* and continue mixing until absorbed. (See note about remaining 1/4 cup of water).
- Cover bowl with plastic wrap, plate or towel and let the dough rise in a warm place for 2 hours. (Read step 7 about preheating)
- Preheat your oven to 450° F for at least 30 minutes before the final rising time. Your oven needs to be nice and hot. Line 1 large baking sheet or pizza pan (or pizza stone) with unbleached parchment paper.
- At the 2-hour mark, transfer the dough to a parchment-lined baking sheet or other.
- Spread the dough with a spatula until you reach about 10 inches in diameter. You can also dust the top of your dough with flour to help shape it (flatten it) with your hands.
- Bake on middle rack in preheated oven for 20 minutes.**
- Remove from the oven, add your pizza toppings and return to the oven for another 12-15 minutes until perfectly baked.***
- Enjoy right away, or let cool on a cooling rack so it doesn’t get soggy.
Instructions for Mini Loaves
Follow steps 1 to 5 above. Line 2 mini loaf pans (5 x 2-in) with unbleached parchment paper. At the 2-hour mark, uncover the dough bowl, and gently scoop out and divide the mixture between 2 lined mini loaf pans or one regular pan, spread evenly. Or transfer the dough to a floured surface, divide and gently shape your dough then place the dough balls into your baking pans. Sprinkle with toppings of choice (optional). Bake on middle rack in preheated oven for about 35 minutes (until edges are golden brown). One larger loaf (7.5-in x 3.5-in) will need to bake for about 50 minutes. Remove the bread from pans right away if possible. If they seem stuck, don’t force it. Let cool for 10 minutes then try again. Remove from pan(s) and cool completely on a wire rack. Slice and enjoy!
Instructions for Rolls
Follow steps 1 to 5 above. Once the dough is ready, scoop out a palm-sized amount and plop it down (leaving space between each) on an unbleached parchment-lined baking sheet (or baking pan of choice). Gently shape with hands if necessary. Flatten a little to achieve thinner rolls. Or transfer the dough onto a floured surface divide your dough into 6 pieces and roll in your hands to shape. Have a look at all the process photos in the post to help you. Sprinkle with your favourite toppings and bake on the middle rack in a preheated 450° F oven for about 25 minutes. Note: if bottoms are getting dark around the 18-minute mark you can always flip the rolls over for the rest of the baking time. Remove from oven, cool on a wire rack, enjoy!
Notes
*Let dough sit for 5 minutes before deciding if you need the remaining 1/4 cup of water (for a total of 2 cups). If you’re not sure, leave it as is (1-3/4 cup total) for your first bake. Adjust accordingly for your next bake. Lately, 1-3/4 cups (414g) is enough water even when I change up the flours.
**If you have a pizza baking stone you can slide your pizza crust with parchment paper onto the preheated pizza stone. Bake for 12 minutes, then remove the parchment paper for the remaining 8 minutes. See additional preheating notes in the tips below.
*** Pizza crust for later
Bake on middle rack in preheated 450 degrees F oven for about 20 minutes. Remove from the oven and let cool on the cooling rack. Once cooled, wrap up and refrigerate until ready to use. Will keep in the refrigerator for five days. Once ready to prepare, top your pizza with your favourite toppings and bake in a preheated 425-degree oven for 12-15 minutes.
Leftovers freeze very well. Slice before freezing. You can even freeze the pre-baked pizza crust. Simply add your toppings once you’re ready to bake!
TOOLS: You’ll need a large bowl, measuring cups for dry goods and liquids, a kitchen scale if you want to weigh your ingredients, measuring spoons, a mixing spoon, a spatula, a flour sifter, unbleached parchment paper, and baking pans (cookie sheet, loaf pan(s), or other). If you have a baking stone, use it for the pizza or rolls.
TIPS: To measure flour, I suggest scooping it with a spoon from the jar or flour bag into the measuring cup. Never pack it in. Better yet, use a kitchen scale for precision.
If using a baking stone, preheating it in the oven at the same time as the oven is warming up is recommended. Use a large plate, cutting board, or the backside of another baking sheet to help you transfer the parchment paper with unbaked pizza crust or rolls. Just slide the paper and dough right onto the hot stone in the oven and follow the suggested baking times.
For best results (or just for fun) try milling whole grains using a clean spice/coffee grinder, small blender or grain mill. It creates the best textures and enhances all the beautiful flavours of homemade bread.
SUBSTITUTIONS:
Flour: In place of millet flour, you can use sorghum or light coloured buckwheat flour. Or consider using more oat flour. If you can’t consume oats you can replace the oats with sorghum flour. If you don’t have arrowroot starch you can replace it with tapioca flour or potato starch or a little of both potato starch and tapioca flour/starch.
Psyllium husk: If you can’t eat or don’t like using psyllium husk, you could try just leaving it out or adding 1 extra tablespoon of arrowroot starch with 1 tablespoon of ground chia seeds or flaxseed meal. Follow the rest of the recipe as listed.
Sugar: You can use maple syrup if you don’t have coconut palm sugar.
Allergen Notice: Make sure that all your ingredients are labelled free of the top allergens you avoid.